Author’s Note: This post is broken up into 2 parts. Part 1 tell the What and Why of this project. Part 2 tells the How.
Part 1:
Goals:
The main goal of this project was to build a framework for visualizing the data that we began collecting in our first project: The Wireless Sensor Network Framework. While that project allowed us to begin collecting data and transmitting to a central server, it had no method for actually visualizing the data besides the basic SQL table. That is a rather clunky way of trying to digest data. Since our end goal as an organization is to find utility in our information, we must be able to understand the narratives behind the data rather than the pure numbers themselves.
By constructing a website on our local network to display this data, we could begin to display our sensor readings in a more meaningful way. The website does this by allowing us to organize and filter our information in ways that fit our current studies. Rather than reading a full table, a page on the website can be dedicated to a particular aspect of the sensor readings or a particular study that pulls data from multiple places. It allows us to find the context that make up these sensor readings
End Result:
What we ended up with was bare bones website, hosted on a raspberry pi, and constructed by the python module Django. It is essentially a blank slate lacking any styles or interactions. It only has the sensor readings and some aggregates of those readings such as counts and averages.
Reflections:
It seems there are a couple ways to look at the results of this project. The first being that it does not accomplish what we set forth to do in our original goal statement. The second is that it does exactly. I tend to lean towards the second way.
I say this because while the current iteration of the website does not accomplish much more than the original project, there is a lot of potential in what we have constructed here. The current regurgitation of the SQL Database of sensor readings is already more advanced than our first project. We have the database split up per sensor for example. We also have aggregate data. More importantly though, we now have this data in a framework that allows us to build new apps. Django’s app framework could, for example, allow us to create a new study and then pull data from the various sensors available to us as we see fit. It is exactly this functionality that we were looking for in this project. As a framework, it is more about potential than the “final” result.
Therefore, it seems our next steps would be to create a study and start organizing data. In order to maximize the potential here, we need to start collecting and combining data. We need to start reconstructing the narrative that the data is trying to tell us.
Part 2:
Required Equipment:
(1) Computer Monitor, Keyboard, and Mouse
(x) The sensors that were constructed in Project 1: Wireless Sensor Network Framework
Software:
Equipment and Software notes:
Django (https://www.djangoproject.com/) is a python based web-framework that makes it quite easy to get a website up and running. I found it useful as a first time developer as it allowed me to set up my content without needing to worry much about the bits and pieces of creating a functioning website. That is not to say that I did not learn anything about how websites work but since the main goal was to store information in an easy to retrieve and easy to visualize way, getting into the specifics of website creation was not important. For those looking to follow this path, Django has a nice tutorial in their documentation. (https://docs.djangoproject.com/en/1.10/)
Guide to getting this working:
-
Understand how Django runs
As I posted above, Django has a great tutorial here (https://docs.djangoproject.com/en/1.10/). It provides an overview of the basic building blocks of the framework.. Below is a quick summary of those necessary pieces though for more in depth information, I would really recommend checking out the Django Documentation::
- Views: This is a callable function that takes a web request and returns a web response. When this function is called, it includes or fetches an information is needed to populate the web response.
- URLs: This is a set of information that tells Django what to do with a URL pattern (ie. grab a particular view). The particular patterns are defined by regular expression strings.
- Models: These are python classes that are the definitive source of information about a websites/webpages data. Each model has its own associated database with the database’s fields being defined within the model class. It also includes any associated behaviors.
- Static Files: These are any HTTP templates that the views might call in their web responses. It also includes any CSS style sheets or Java scripts.
-
Define the information Hierarchy of the Site
After learning the basic framework, it is important to figure out how these building blocks work best with our information and our sensors. Without diagramming the structure, we can get lost in the code and not have a clear idea of what we are writing. We would perhaps code information that is not needed or that creates a structure that is not what we actually need. The structure that I chose is diagrammed below:
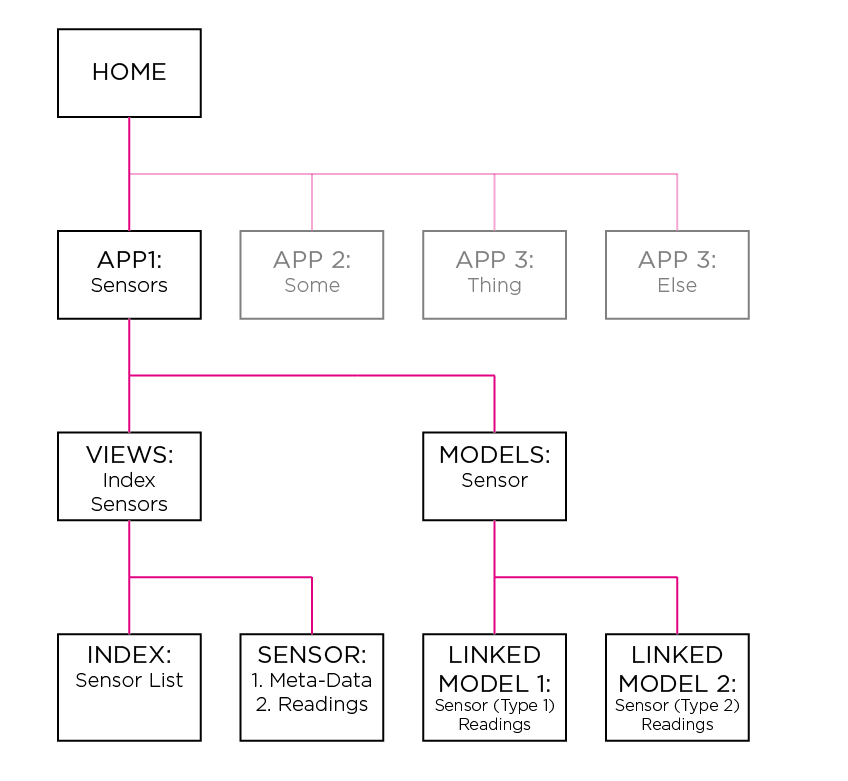
Essentially what is happening is that there will be a main site with multiple apps built within it. At this point, I have only designed 1 app, the sensors app which I have named “sensorsHome”, but as the diagram shows, there is potential to add others. This app then includes any associated views to display depending on what sort of information needs to get shown. The app also includes a series of models, some nested within others.
-
Define Models
In this case, the information that populates the models is based on the information we were able to pull of the sensor network in project 1. (https://empathicfutures.wordpress.com/portfolio/project-1-wireless-sensor-network-framework/) Supposing that this project will eventually include another sensor type than just the DHT11 though, I have decided to include a modular system for logging sensors. The first model in the diagram then is a global model for a sensor’s’ information including its name, type, creation date, and ip address. The linked model (using Django’s foreign key) is sensor-type dependent. It is linked directly to 1 sensor. For the DHT11-type sensor model, for instance, it would have an associated DHT11_readings model that tracks a time-stamp, sensor name (redundant but nice to see imo), and the temperature and humidity readings. Another example might be a TSL2561-type sensor with TSL2561_readings including a time-stamp, sensor name, and lux readings.
</pre>

from django.db import models
from django.utils import timezone

# Create your models here
class Sensor(models.Model): #the base class for the app
sensor_name = models.CharField(max_length = 100, unique = True, primary_key = True)
sensor_type = models.CharField(max_length = 100, default = 'sensor')
date_created = models.DateTimeField('date and time created', auto_now_add = True)
ip_address = models.GenericIPAddressField(default = '0.1.2.3')
sensor_text = models.CharField(max_length = 200, default = 'text')

def __str__(self):
return self.sensor_name

###############################################################################
#add sensor detail type model here

class DHT11_readings(models.Model):
DHT11 = models.ForeignKey(Sensor, on_delete = models.CASCADE)
timestamp = models.DateTimeField('date and time of reading', unique = True,
primary_key = True, default = timezone.now)
temperature = models.FloatField(default = -1000)
humidity = models.FloatField(default = -1000)

def __str__(self):
return '%s Degrees and %s Humidity at %s' % (self.temperature, self.humidity,
timezone.localtime(self.timestamp))

class TSL2561_readings(models.Model):
TSL2561 = models.ForeignKey(Sensor, on_delete = models.CASCADE)
timestamp = models.DateTimeField('date and time of reading', unique = True,
primary_key = True, default = timezone.now)
lux = models.FloatField(default = -1000)

def __str__(self):
return '%s Lux at %s' % (self.lux, timezone.localtime(self.timestamp))
-
Define Views
The views, then, would display this collected information. From how I visualized the website, this sensors app would need 2 views: an index view for displaying all of the sensors available to view and a sensor-type specific detail view displaying the sensor’s meta-data and readings. More specifically, the index would include a list of all the sensors available and display them by name. As new sensors are added, the page would dynamically update. The reading page, on the other hand, takes the readings associated with a particular sensors and shows both aggregate information describing those readings and a number, currently defined as the last 60, of the latest readings.
from django.shortcuts import render # Create your views here. from django.http import HttpResponse from django.db.models import Avg, Max, Min, Count from .models import Sensor, DHT11_readings def index(request): sensors_list = Sensor.objects.order_by('-date_created')[:10] context = {'sensors_list': sensors_list} return render(request, 'sensorsHome/index.html', context) def detail_dht11(request, sensor_name,sensor_type): sensor = Sensor.objects.get(sensor_name = sensor_name) readings_list = sensor.dht11_readings_set.all().order_by('-timestamp')[:60] readings_count = len(sensor.dht11_readings_set.all()) aggregate_dict = sensor.dht11_readings_set.aggregate(Avg('temperature'), Avg('humidity'), Max('temperature'), Min('temperature'), Max('humidity'), Min('humidity')) context = {'sensor' : sensor, 'sensor_type' :sensor_type, 'readings_list' : readings_list, 'readings_count': readings_count, 'aggregate_dict': aggregate_dict } return render(request, 'sensorsHome/detail_dht11.html', context) def detail_tsl2561(request, sensor_name,sensor_type): sensor = Sensor.objects.get(sensor_name = sensor_name) readings_list = sensor.tsl2561_readings_set.all().order_by('-timestamp')[:60] readings_count = len(sensor.tsl2561_readings_set.all()) aggregate_dict = sensor.tsl2561_readings_set.aggregate(Avg('lux'), Max('lux'), Min('lux')) context = {'sensor' : sensor, 'sensor_type' :sensor_type, 'readings_list' : readings_list, 'readings_count': readings_count, 'aggregate_dict': aggregate_dict } return render(request, 'sensorsHome/detail_tsl2561.html', context ) -
Define Templates
The templates at this point are fairly simple. While there is a linked style sheet in each HTML template, it does not actually do anything. Creating a functioning style-sheet for the site will come at a later date. As of right now, the most importance was placed on actually getting the Django website up and running. The plain HTML templates were sufficient in that regard.
When creating these templates, the most important aspects were trying to keep them as modular as possible. This way, the index is able to dynamically update with all the possible sensors as they come online. Each sensor’s hyperlink refers Django to a sensor-specific template page. The code line for the index portion is as follows:
{% load staticfiles %}


<h1>Sensors</h1>
<span></span>
<h5>See below for a list of the currently available sensors</h5>
<span></span>
{% if sensors_list %}
<ul>
{% for sensor in sensors_list %}
	<li><a href="sensor.sensor_type sensor.sensor_name %}/">{{ sensor.sensor_name}}</a></li>
{% endfor %}</ul>
{% else %}
No polls are available.
{% endif %}


</pre>
<pre>
and an example of the individual sensor’s page:
{% load staticfiles %}


{% load tz %}
{% localtime on %}


<header>
<h1>{{ sensor.sensor_name }}</h1>
<h4>{{ sensor.sensor_type }}</h4>
</header>


<div>
<h4>Meta Data</h4>
{{ sensor.date_created }}
{{ sensor.ip_address }}
{{ sensor.sensor_text }}</div>
<span></span>
<div>
<h4>Aggregate Data</h4>
Number of Readings: {{ readings_count }}
Averagure Temperature: {{ aggregate_dict.temperature__avg }}
High Temperature: {{ aggregate_dict.temperature__max }}
Low Temperature: {{ aggregate_dict.temperature__min }}
Average Humidity: {{ aggregate_dict.humidity__avg }}
Max Humidity: {{ aggregate_dict.humidity__max }}
Low Humidity: {{ aggregate_dict.humidity__min }}
<div>
<ol>
Readings from the last hour
{% for reading in readings_list %}
{{ reading }}
{% endfor %}</ol>
</div>
{% endlocaltime %}
Up Next
At this point, the sensor website should be up and displaying information. Hopefully it is not giving any errors though Django has a useful debugging page that ought to help. Also remember to make the proper Django migrations or restart apache as needed throughout the process.
From this point forward, there are still a couple things that need to occur. The first is just maintaining the site. As new sensors are introduced, the proper models and templates need to be added. I have found this to be rather easy. Since I started writing this post, I added TSL2561 capability. Copying models and templates was as simple as copy+paste and then changing the variables.
The second thing that needs to be done is adding a style sheet. Plain HTML is not particularly visually appealing or compositionally functional. Creating a style for this site is one of the next projects that I will be working through.
As usual, if you have any comments or thoughts on how to do this better, feel free to leave them below.
